The quality planning function allows your quality department to plan inspections for goods receipts from vendors and production, work in process, and stock transfers. A quality notification can be used to request action to be taken by the quality department.
This may be to review an internal problem, an issue with items from a vendor or a customer complaint. The quality inspection is the physical inspection using specifications defined in quality planning.
SAP Supply Chain Planning
In SAP the quality inspection plans define how an item is to be inspected. The plan also establishes how the inspection is to take place, the item characteristics to be inspected and all the required test equipment that is needed for the inspection.
The inspection plan is an important part of the QM planning process. The plan defines which characteristics of the item are to be inspected in each operation and what kind of test equipment is required for the inspection.
The purpose of this tutorial is to explain the steps to activities involved in setting up the Mails from SAP. The steps are common across SAP R/3 as well as SAP new dimension products like APO, CRM, BIW where the SAP Kernel 620 and above is used.
Step-by-Step Process to Configure Mail:
Following activities needs to be performed step by step to activate the mail from SAP.
Step 1.1 SAP System Profile Set-up: Set the Instance Profile (RZ10 transaction) to allow SAP to connect to external SMTP servers.
Access the transaction RZ10 for set-up the profiles parameter and Select Instance Profile.
Alternatively we can use the menu pathTools – CCMS – Configuration – Profile Maintenance.
Find out a parameter named icm/server_port_2. If it does not exist then create it by setting the icm/server_port_2 parameter value to the following: PROT=SMTP, PORT=1080, TIMEOUT=180. As given below:
After setting the parameter or changed the value in the SAP profile, restart the instance to update the new value.
Step 1.2: Configure and Activate the SMTP node in SAPConnect Administration
To activate and configure SMTP node Mail communication configuration needs to be done via SCOT transaction and alternatively one can use the menu path Tools – Business Communication SAPconnect.
Access the SCOT transaction (SAPconnect Administration) and then from Settings menu, select Define Domain. The Internet Mail Addresses dialog is being displayed.
In the Default domain field, type the company’s email domain (for example, mycompany.com) and click the confirmation button.
Within SAPconnect Administration make sure that you are in node view, and choose the SMTP node and the default screen will be displayed as shown below:
1.2.1 Set-up Default domain:
Default Mail domain is set using the menu path Settings – Default Domain.
Default domain name should be entered without “@” sign i.e. if e-main address is vinod@adani.com. The mail domain is adani.com and not @adani.com
1.2.2 INT (Internet Mail) Set-up:
Click on INT, system will display SMTP node. Double click on the INT node which will open an input screen shown as below, following information required:
Field
Description
Possible Values/Default Values
Mandatory
Description
Name of the Node
Yes
Repeat Send Process time
Frequency of mail send
Yes
Mail Host
IP Address of SMTP server
Yes
Node in Use
Is it an Active node
Select the entry
Yes
Mail port
Mail port of SMTP server
25
Yes
Code Page
Code Page for mail conversion
No Conversion into other Character Set
Yes
General node data dialog
Make Sure about the below given information is correct:
Node in use is Choosen
The Mail host field holds your SMTP (outgoing mail) provider. For example, smtp.provider.com
The Mail port field holds the right port used to connect to your SMTP server
Under Supported address types, click the Set button next to the Internet checkbox. The Address type for node dialog is displayed.
In case the Address area box does not contain an asterisk (*, meaning that all addresses are permitted), make sure that the email address “send@letter.postalmethods.com” is permitted for outgoing emails.
Under Output Formats for SAP Documents, from the SAPscript/Smart Forms drop-down menu, select PDF.
Click the confirmation button. In SAPconnect: General node data, click the confirmation button again.
Step 1.3: Scheduling an email sending job within the SAPConnect Administration
To schedule a job which sends outgoing emails in SAPconnect Administration the following steps are required:
Access the SCOT transaction (SAPconnect Administration)
From the View menu, select Jobs. If there is an existing job of the variant SAP&CONNECTALL, a job is already scheduled for sending outgoing emails. Skip items 3 and 4 and move forward to Step 1.4.
In case the variant SAP&CONNECTALL is NOT defined yet: from the Job menu, select Create and Define the following options for the new job:
Type a name for the job.
Select the SAP&CONNECTALL job variant.
Select the option Schedule Periodically.
Specify a reasonably short time interval (for example, 10 minutes). Users will need to wait for this time interval before their letters are sent.
Step 1.4: Assign email addresses to SAP users
To define internal email addresses for users who need to send letters via Postal Methods:
Identify which SAP users will need to use PostalMethods from SAP R/3
Access the SU01 transaction
If any of the relevant users do not have an internal email address, create an address for each of them. When creating each new address, ensure that Comm. Method is set to INT E-Mail
1.2.3 Configure Address Area
To Configure Address Area you have to Click pushbutton against the internet and screen will be displayed as below.
Enter “*” in the address area and Press enter which will take the control back to the main screen.
Press enter again to complete the SMTP node configuration.
1.2.4 Mail Confirmation Set-up
Mail confirmation set-up needs to be configured other wise mail will be always on waiting to deliver state.
Use the menu path Setting – Confirmation of Receipt.
Make the settings as displayed in the above screen and press .
1.3 SICF set-up & Activate
1.3.1 SICF set-up
Execute the SICF transaction and double click on the SAPconnect node. Press the enter “0” in the profile parameter no. Select the entry and save by press.
Select the entry and save by press .
1.3.2 Activate SAPconnect Node
Select the SAPconnect Node and user the menu path Service/Virtual Host – Activate.
System will prompt for confirmation. Press “Y” to activate all nodes below.
1.4 Mail Send Test
1.4.1 Mail Send
Send a test mail via transaction SO00 or using menu path System – Shot Message. The following screen will be displayed.
Field
Description
Possible Values / Default Values
Mandatory
Title
Title of Mail (Subject)
–
Yes
Document
Message Text Content
–
No
Recipient
E-Mail address of Recipiant
–
Yes
Send the mail by pressing icon or using menu path Document – Send or by pressing. Now the mail will send to the recipient.
1.4.2 Mail Deliver
Execute the SCOT transaction, the below-mentioned screen will be displayed, indicating one mail is waiting for delivery. If you scheduled the mail delivery program then mail is delivered on a specific interval.
To test the mail press the push button and enter the address area “INT”. After the successful execution of the step the following information is displayed in the SCOT transaction screen.
The SAP GUI for HTML generates HTML pages for all SAP screens so that it ccan be used within a standard web browser such as Chrome or if you really want to IE/Edge.
The easiest way to access this GUI is to speak to your SAP basis team who will let you have a URL where you will use the same login details as you would when accessing your standard SAP GUI.
…Alternatively, if you have the required authorisations you can find the URL of the GUI yourself following the below simple steps.
Step 1 – Use transaction SICF to locate the SAP Web GUI functionality
Execute transaction SICR (Memory aid: SicFrog) and enter WEBGUI into the service name. I fnothing is returned try *WEBGUI*, *SAPGUI* or even *GUI*.
Step 2 – Find entry for WEBGUI
Within the results find the one that looks the most appropriate
Step 3 – Test WEBGUI service
Now right click on it and select Test
This should then call the URL for the SAP Web GUI functionality
Step 3 – Using the WEBGUI to acces transactions
Using the SAP Web GUI is much the same as using any SAP GUI, simply enter a transaction code such as IW32 into the command box and press enter
The tranasction will execute as normal
Return to SAP Screen Personas development information including how to create your first personas flavor…
While maintaining the ztable through SM30 got the following error.
Maintenance dialog for ztable is incomplete or not defined
Answer:
All DB tables do not automatically have a table maintenance created.
The message indicates no table maintenance exists for the Z table.
From SE11 you need to create the table maintenance using the Table MAintenance Generator.
=============================
Go to SE11 and enter the Z table name for which the table maintenance generator has to be generated. Click on Change.
Click on Utilities à Table Maintenance Generator
Enter Authorization group (For e.g. &NC&) Function group (go to SE80 for creating function group)
You can select either one step or two step. Assign Screen numbers (To assign Screen numbers click on the button ‘Find Scr no’. It will propose screen no’s)
Then Create. Save
Single step: Only overview screen is created i.e. the Table Maintenance Program will have only one screen where you can add, delete or edit records.
Two step: Two screens namely the overview screen and Single screen are created. The user can see the key fields in the first screen and can further go on to edit further details.
You can now create TCode for the table maintenance generator. Enter the TCode to be created and click on Create.
Select “Transaction with parameters (Parameter transaction)”
Click on save. Now you can create the table entries through the transaction created above.
JSP Life Cycle is defined as translation of JSP Page into servlet as a JSP Page needs to be converted into servlet first in order to process the service requests. The Life Cycle starts with the creation of JSP and ends with the disintegration of that.
Let’s learn different phases of JSP Life Cycle
When the browser asks for a JSP, JSP engine first checks whether it needs to compile the page. If the JSP is last compiled or the recent modification is done in JSP, then the JSP engine compiles the page.
Compilation process of JSP page involves three steps:
Parsing of JSP
Turning JSP into servlet
Compiling the servlet
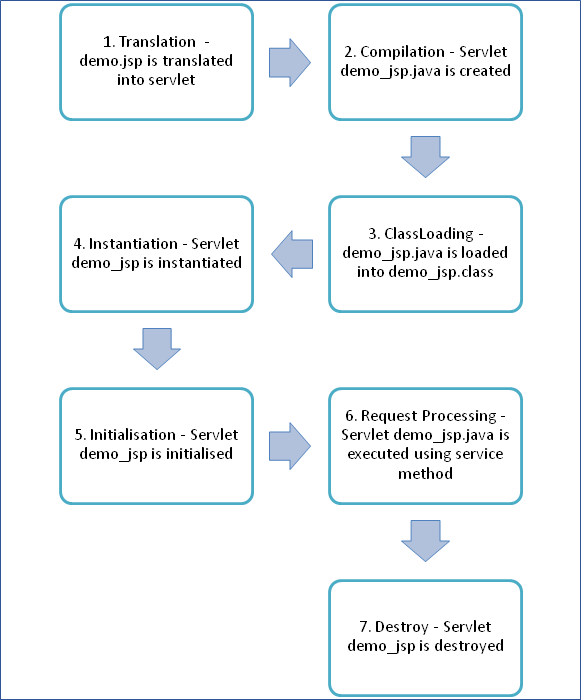
JSP Lifecycle is depicted in the below diagram.
Following steps explain the JSP life cycle:
Translation of JSP page
Compilation of JSP page(Compilation of JSP page into _jsp.java)
Classloading (_jsp.java is converted to class file _jsp.class)
Instantiation(Object of generated servlet is created)
Initialisation(_jspinit() method is invoked by container)
Request Processing(_jspservice() method is invoked by the container)
Destroy (_jspDestroy() method invoked by the container)
Let us have more detailed summary on the above points:
Translation of the JSP Page:
A Java servlet file is generated from a JSP source file. This is the first step of JSP life cycle. In translation phase, container validates the syntactic correctness of JSP page and tag files.
The JSP container interprets the standard directives and actions, and the custom actions referencing tag libraries (they are all part of JSP page and will be discussed in the later section) used in this JSP page.
In the above pictorial description, demo.jsp is translated to demo_jsp.java in the first step
Let’s take an example of “demo.jsp” as shown below:
Code Line 3 – 4: Title Tag i.e. Demo JSP and closing head tag
Code Line 5,6: Scriptlet tag wherein initializing the variable demo
Code Line 7 – 8: In body tag, a text to be printed in the output (Count is: )
Code Line 9: Scriplet tag where trying to print the variable demovar with incremented value
Code Line 10-11: Body and HTML tags closed
Demo JSP Page is converted into demo_jsp servlet in the below code.
Code explanation for Demo_jsp.java
Code Line 1: Servlet class demo_jsp is extending parent class HttpServlet
Code Line 2,3: Overriding the service method of jsp i.e. _jspservice which has HttpServletRequest and HttpServletResponse objects as its parameters
Code Line 4: Opening method
Code Line 5: Calling the method getWriter() of response object to get PrintWriterobject (prints formatted representation of objects to text output stream)
Code Line 6: Calling setContentType method of response object to set the content type
Code Line 7: Using write () method of PrintWriter object trying to parse html
Code Line 8: Initializing demovar variable to 0
Code Line 9: Calling write() method of PrintWriter object to parse the text
Code Line 10: Calling print() method of PrintWriter object to increment the variable demovar from 0+1=1.Hence, the output will be 1
Code Line 11: Using write() method of PrintWriter object trying to parse html
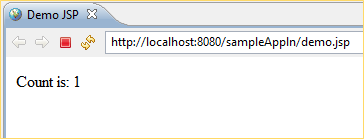
Output:
Here you can see that in the screenshot theOutput is 1 because demvar is initialized to 0 and then incremented to 0+1=1
In the above example,
demo.jsp, is a JSP where one variable is initialized and incremented. This JSP is converted to the servlet (demo_jsp.class ) wherein the JSP engine loads the JSP Page and converts to servlet content.
When the conversion happens all template text is converted to println() statements and all JSP elements are converted to Java code.
This is how a simple JSP page is translated into a servlet class.
Compilation of the JSP Page
The generated java servlet file is compiled into java servlet class
The translation of java source page to its implementation class can happen at any time between the deployment of JSP page into the container and processing of the JSP page.
In the above pictorial description demo_jsp.java is compiled to a class file demo_jsp.class
Classloading
Servlet class that has been loaded from JSP source is now loaded into the container
Instantiation
In this step the object i.e. the instance of the class is generated.
The container manages one or more instances of this class in the response to requests and other events. Typically, a JSP container is built using a servlet container. A JSP container is an extension of servlet container as both the container support JSP and servlet.
A JSPPage interface which is provided by container provides init() and destroy () methods.
There is an interface HttpJSPPage which serves HTTP requests, and it also contains the service method.
Initializationpublic void jspInit()
{
//initializing the code
}
_jspinit() method will initiate the servlet instance which was generated from JSP and will be invoked by the container in this phase.
Once the instance gets created, init method will be invoked immediately after that
It is only called once during a JSP life cycle, the method for initialization is declared as shown above
Request processingvoid _jspservice(HttpServletRequest request HttpServletResponse response)
{
//handling all request and responses
}
_jspservice() method is invoked by the container for all the requests raised by the JSP page during its life cycle
For this phase, it has to go through all the above phases and then only service method can be invoked.
It passes request and response objects
This method cannot be overridden
The method is shown above: It is responsible for generating of all HTTP methods i.eGET, POST, etc.
Destroypublic void _jspdestroy()
{
//all clean up code
}
_jspdestroy() method is also invoked by the container
This method is called when container decides it no longer needs the servlet instance to service requests.
When the call to destroy method is made then, the servlet is ready for a garbage collection
This is the end of the life cycle.
We can override jspdestroy() method when we perform any cleanup such as releasing database connections or closing open files.
.jpg)
.jpg)
.jpg)
.jpg)
.jpg)
.jpg)
.jpg)
.jpg)
.jpg)
.jpg)
.jpg)